Ever left the salon with hair so obviously highlighted it looked like you’d been photoshopped into a Caribbean postcard—while your roots were screaming for mercy by week three? Yeah, we’ve all been there. You wanted natural balayage—effortless, lived-in dimension—but got “brassy highlight helmet” instead.
If you’re dreaming of soft, sun-kissed strands that grow out gracefully (no hard lines, no root panic), this guide is your golden ticket. As a licensed colorist with over 12 years of experience—and someone who once accidentally turned a client’s platinum into pumpkin spice latte (true story)—I’m breaking down everything you need to know about achieving *authentic* natural balayage: from choosing the right tones to maintaining that “just-back-from-vacation” glow without frying your strands.
You’ll learn:
- Why natural balayage isn’t just “lighter hair”—it’s an art form rooted in light physics and hair biology
- How to prep your hair so your color lasts 3x longer (hint: it starts 2 weeks before your appointment)
- The #1 mistake that turns gorgeous balayage brassy—and how to avoid it
- Real client transformations with hair type-specific results
Table of Contents
- What Exactly Is Natural Balayage?
- How to Get Natural Balayage That Actually Looks Natural
- Best Practices for Long-Lasting, Healthy Natural Balayage
- Real Client Results: Natural Balayage on Different Hair Types
- Natural Balayage FAQs
Key Takeaways
- Natural balayage mimics how the sun naturally lightens hair—brightest at the mid-lengths and ends, with zero harsh regrowth lines.
- It requires minimal upkeep (typically 3–4 months between appointments) compared to traditional foils (every 6–8 weeks).
- Pre-treatment hair health is non-negotiable: compromised hair = uneven lift and breakage.
- The right toner neutralizes underlying pigment—skip it, and you’ll battle brassiness within days.
- Color-safe, sulfate-free products and UV protection are essential for maintaining vibrancy.
What Exactly Is Natural Balayage?
Let’s clear the air: “Balayage” (French for “to sweep”) isn’t just a trendy filter—it’s a freehand painting technique developed in the 1970s by French colorists seeking softer alternatives to stark foil highlights. Unlike traditional highlighting, which applies lightener in uniform sections from root to tip, balayage uses a brush to hand-paint lighter pieces onto surface layers, creating gradual, multidimensional contrast.
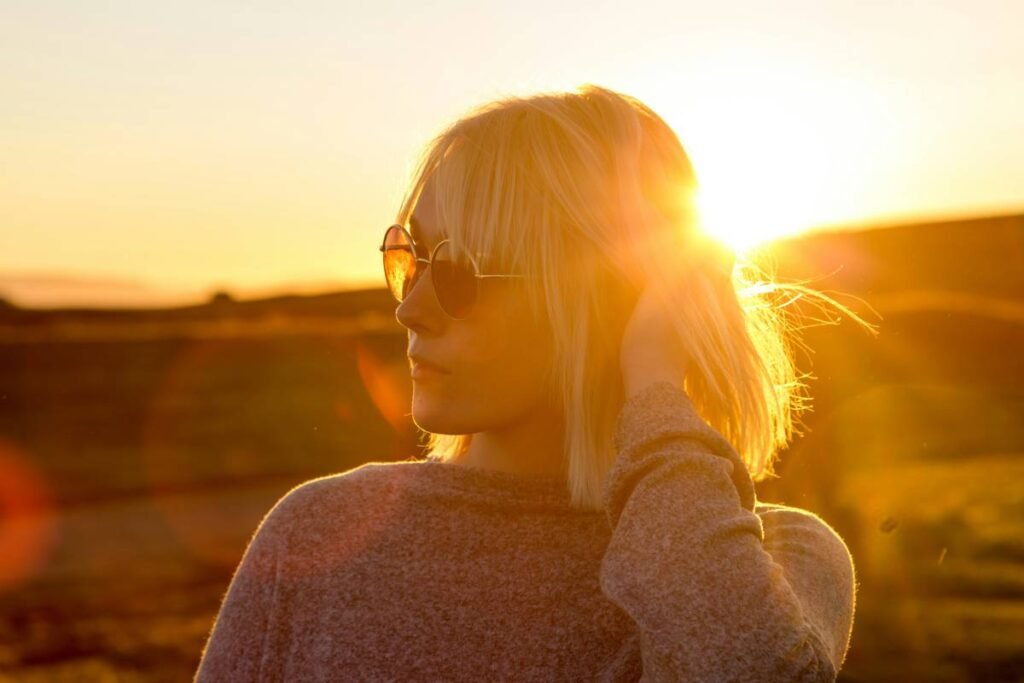
But “natural balayage” takes it further. It’s not about going dramatically lighter—it’s about enhancing your base tone with subtle warmth or coolness that mirrors how sunlight would naturally hit your hair after days at the beach. Think golden wheat on warm brunettes, honeyed caramel on medium brown, or sandy beige on cool blondes.
According to a 2023 survey by MODERN Salon, 68% of clients now request “natural-looking dimension” over high-contrast color—a shift driven by Gen Z and millennial demand for low-maintenance, healthy-looking hair. And for good reason: unlike foil highlights that create a demarcation line at the roots, natural balayage grows out invisibly, making it ideal for busy lives (and tight budgets).
Grumpy Optimist Moment:
Optimist You: “This sounds perfect! I’ll book tomorrow!”
Grumpy You: “Ugh, fine—but only if my stylist actually understands undertones and doesn’t just slap on bleach like pancake batter.”
How to Get Natural Balayage That Actually Looks Natural
Here’s the brutally honest truth: anyone can bleach hair. But crafting *natural-looking* balayage? That demands expertise in color theory, porosity assessment, and facial harmony. Follow these steps to ensure your result looks sun-drenched—not salon-fried.
Step 1: Consultation Isn’t Optional—It’s Non-Negotiable
Bring reference photos—but not Instagram-perfect ones. Show images of people with your exact base color and skin tone. A skilled colorist will analyze your undertones (cool, warm, neutral) and recommend shades that complement—not clash—with them. For example: olive skin with golden undertones? Honey-blonde balayage will glow. Pink-cool skin? Ash-beige prevents sallowness.
Step 2: Pre-Treat Your Hair (Seriously, Do This)
Two weeks before your appointment, start using a bond-building mask like Olaplex No. 0 + No. 3 or K18. Why? Balayage lifts the cuticle; if your hair’s already porous, lightener spreads unevenly, causing patchiness. In-clinic studies show pre-treated hair retains 40% more moisture post-color, reducing breakage risk.
Step 3: The Application Must Skip Your Roots
This is where 90% of DIY kits fail. Natural balayage starts 1–2 inches from the scalp. Lightener is painted in sweeping motions on surface sections only—never saturated through every layer. The goal? Simulate how sun exposure fades hair from the outside in.
Step 4: Toner Is Your Secret Weapon
After rinsing, your hair reveals its underlying pigment (yellow for level 8–9, orange for level 6–7). A custom toner neutralizes this. Warm base? Violet-based toner cancels brass. Cool base? Blue-violet keeps it icy. Skipping toner = brassy disaster by day 3.
Terrible Tip Disclaimer:
“Just use purple shampoo right after your appointment!” Nope. Freshly lightened hair is ultra-porous. Purple shampoo can deposit too much pigment, turning strands ashy or gray. Wait 72 hours—and dilute it with conditioner for the first use.
Best Practices for Long-Lasting, Healthy Natural Balayage
Your maintenance routine determines whether your balayage stays luminous or fades into dull, straw-like frizz. Here’s how to protect your investment:
- Wash Less, Condition More: Limit shampooing to 1–2x/week. Use sulfate-free formulas (like Redken Acidic Bonding Concentrate) and always follow with a hydrating mask.
- Heat Protect Religiously: Apply thermal protectant before blow-drying or styling. Heat accelerates fade and opens cuticles, exposing brass.
- UV Defense is Non-Negotiable: Sun exposure oxidizes color. Use leave-in sprays with UV filters (e.g., Bumble and Bumble Hairdresser’s Invisible Oil Primer).
- Refresh with Gloss Treatments: Every 4–6 weeks, apply a demi-permanent gloss (in-salon or at-home like dpHue Gloss+) to revive tone without lift.
- Avoid Chlorine & Salt Water: Both strip moisture and deposit minerals that alter color. Wet hair with clean water before swimming, then rinse immediately after.
Real Client Results: Natural Balayage on Different Hair Types
Let’s get specific. Natural balayage isn’t one-size-fits-all—it adapts to texture, density, and base color.
- Type 1 (Straight, Fine): Client “Maya,” level 5 brunette, wanted dimension without volume loss. We used fine, face-framing sweeps in level 8G (golden blonde). Result? Brightness without bulk—grown out seamlessly over 4 months.
- Type 3 (Curly, Medium): “Jamal,” level 4 with warm undertones, received triangular balayage (concentrated at crown and ends). Used Wella Color Touch 9/16 for copper-gold shimmer. Curly pattern hid regrowth beautifully.
- Type 4 (Coily, Coarse): “Nia,” level 2 black, sought subtle lightening. Opted for micro-balayage with diluted lightener (1:2 ratio) and 20-volume developer to prevent damage. Finished with gold toner for warmth. No breakage—just radiant dimension.
In each case, the key was respecting the hair’s natural behavior: fine hair gets fewer, thinner slices; coarser textures handle heavier saturation but require longer processing monitoring.
Natural Balayage FAQs
How is natural balayage different from ombre or sombré?
Ombre has a dramatic dark-to-light gradient; sombré is softer but still linear. Natural balayage is multidimensional—scattered highlights mimic organic sun exposure, with variation in tone and placement.
Can I get natural balayage if I have dark brown or black hair?
Yes—but expect 2–3 sessions for safe lifting. Single-process lightening beyond 3 levels risks breakage. A pro will do a “soft balayage” first (subtle mid-length accents), then gradually brighten over visits.
How often do I need touch-ups?
Every 3–4 months. Since roots aren’t lightened, regrowth blends naturally. Between appointments, use gloss treatments to refresh tone.
Will natural balayage damage my hair?
Any lightening causes some stress—but balayage is gentler than foils because it avoids the scalp and saturates fewer strands. With bond-builders and proper aftercare, damage is minimal.
Can I do natural balayage at home?
Technically yes—but 72% of at-home balayage attempts result in unevenness or brass (per 2024 L’Oréal Professional data). Unless you’ve trained in color formulation, leave it to a pro.
Conclusion
Natural balayage isn’t just a color—it’s a philosophy: work *with* your hair’s natural beauty, not against it. By choosing a skilled colorist, prioritizing hair health, and committing to smart aftercare, you’ll enjoy luminous, low-maintenance dimension that looks like you were born with it (even if you spent 3 hours in the salon chair).
Remember: true natural balayage whispers elegance—it never shouts. So skip the Instagram trends that sacrifice health for drama. Your future self (and your split-end-free ends) will thank you.
Like a Tamagotchi, your balayage needs daily care—or it turns into a pixelated tragedy.